
This tutorial shows how to leverage the Screaming Frog SEO Spider’s recently released custom JavaScript functionality to create JSON-LD schema markup at scale. With a small amount of code, I will demonstrate how to extract elements from a webpage and integrate each one into a structured data script with variables.
For those of you who might not know JavaScript or be terrified of any code, you can use your favourite LLM, such as ChatGPT, to assist you. I would personally recommend Mike King’s Kermit—a custom GPT designed to specifically help you with Screaming Frog SEO Spider JS snippets!
At the end of this tutorial, my aim is for you to use this guide to automate the creation of structured data with the Screaming Frog SEO Spider — whether it’s for tens, hundreds, or thousands of webpages!
This article is a guest contribution from Ziggy Shtrosberg, a technical SEO specialist.
What Are Custom JavaScript Snippets?
In May 2024, the Screaming Frog SEO Spider introduced custom JavaScript snippets in their version 20.0 update. According to the release notes, JS snippets allow you “to manipulate pages or extract data, as well as communicate with APIs such as OpenAI’s ChatGPT, local LLMs, or other libraries.
The custom JS Snippet settings come prepacked with a few out-of-the-box snippets, such as using AI to generate image alt text, querying ChatGPT, extracting embeddings and more.
With some creative thinking, you can use the capabilities of the JS snippet functionality to transform standard crawl outputs into powerful tools for diverse SEO challenges, thereby making website crawls significantly more effective.
Why Create Structured Data at Scale With Screaming Frog?
Structured data is a type of machine code that helps to describe the webpage to a search engine. It can influence how search engines interpret and display your content. Implementing JSON-LD schema markup can lead to rich snippets in the SERPs, enhance a knowledge graph, improve visibility, and potentially increase click-through rates.
The preferable option is to always create schema markup programmatically, either with pre-built CMS functionality, a plugin, or the support of a developer.
Yet, there are instances when you don’t have access to a programmatic option. This is when Screaming Frog’s JS snippets provide a practical alternative, eliminating the need to rely on online schema markup generators or manually write the code for each page. All of which can be time-consuming and inefficient.
Selecting the Appropriate Schema Type and Page Template
Before we begin, we need to decide on what structured data script we’ll need. For the purpose of this article, I’ve used a fictional scenario in which I’ll populate each of the Search Engine Journal’s (SEJ) blog posts with “article” schema.
You’ll likely need a different script for each page template of your website. For example, an e-commerce site might require different schemas for its homepage, product pages, and blog posts.
Additionally, you’ll need to figure out what elements are available on the webpage, which you can extract from the text or HTML. That will determine what is possible with the schema markup. For example, if your blog article doesn’t reference an author, it would be pointless to add an “author” schema type.
The JSON-LD Schema Markup Template
As mentioned before, in this fictional example, I’ll be creating a JSON-LD script based on an “article” schema type, which will also include “person”, “organization”, and “website” types. With a single crawl, the script will allow us to produce a valid schema for each of SEJ’s blog posts.
I’ll use the “Getting Started In International SEO: A Quick Reference Guide” article as my guinea pig test page, as seen below:

Here is what my final JSON-LD output will look like for this webpage:
<script type="application/ld+json">
{
  "@context": "https://schema.org/",
  "@type": "Article",
  "url": "https://www.searchenginejournal.com/getting-started-in-international-seo-a-quick-reference-guide/529763/",
  "@id": "https://www.searchenginejournal.com/getting-started-in-international-seo-a-quick-reference-guide/529763/#article",
  "headline": "Getting Started In International SEO: A Quick Reference Guide",
  "description": "Expand your reach with international SEO. This guide explores the unique challenges and strategies for succeeding in global markets.",
  "datePublished": "2024-11-11T10:00:43+00:00",
  "wordCount": 2060,
  "timeRequired": "PT10M",
  "image": {
    "@type": "ImageObject",
    "url": "https://www.searchenginejournal.com/wp-content/uploads/2024/10/international-seo-794.png",
    "height": "840",
    "width": "1600"
  },
  "speakable": {
    "@type": "SpeakableSpecification",
    "cssSelector": [
      "h1",
      ".sej-article entrycontent"
    ]
  },
  "author": {
    "@type": "Person",
    "name": "Motoko Hunt",
    "url": "https://www.searchenginejournal.com/author/motoko-hunt/",
    "@id": "https://www.searchenginejournal.com/author/motoko-hunt//#person",
    "jobTitle": "President, International Search Marketing",
    "worksFor": {
      "@type": "Organization",
      "name": "AJPR",
      "url": "https://www.ajpr.com/"
    },
    "sameAs": [
      "https://www.searchenginejournal.com/author/motoko-hunt/feed/",
      "https://twitter.com/motokohunt",
      "https://www.linkedin.com/in/japaneseseo/"
    ]
  },
  "publisher": {
    "@type": "Organization",
    "@id": "https://www.searchenginejournal.com/#organization",
    "url": "https://www.searchenginejournal.com",
    "sameAs": [
      "https://twitter.com/sejournal",
      "https://www.facebook.com/SearchEngineJournal",
      "https://www.linkedin.com/company/search-engine-journal",
      "https://www.youtube.com/c/searchenginejournal",
      "https://www.reddit.com/user/SearchEngineJournal",
      "https://www.google.com/search?kgmid=/m/011sh7hw",
      "http://www.pinterest.com/sejournal/"
    ],
    "name": "Search Engine Journal",
    "logo": [
      {
        "@type": "ImageObject",
        "@id": "https://www.searchenginejournal.com/#logo",
        "inLanguage": "en-US",
        "url": "https://www.searchenginejournal.com/wp-content/themes/sej/images/schema/compact.png",
        "width": 1000,
        "height": 1000,
        "caption": "Search Engine Journal"
      }
    ],
    "foundingDate": "2003",
    "slogan": "In a world ruled by algorithms, SEJ brings timely, relevant information for SEOs, marketers, and entrepreneurs to optimize and grow their businesses -- and careers.",
    "description": "Search Engine Journal is dedicated to producing the latest news, the best guides and how-tos for the SEO and marketer community.",
    "legalName": "Search Engine Journal",
    "alternateName": "SEJ"
  },
  "isPartOf": {
    "@type": "WebSite",
    "name": "Search Engine Journal",
    "@id": "https://www.searchenginejournal.com/#website",
    "url": "https://www.searchenginejournal.com/",
    "mainEntity": {
      "@id": "https://www.searchenginejournal.com/getting-started-in-international-seo-a-quick-reference-guide/529763/#article"
    }
  }
}
</script>
The script uses the “article” schema type. First, I will nest the “person” schema type inside the “author” property. Second, the “organization” will be nested inside the “publisher” property, and third, the “website” schema type will be nested inside the “isPartOf” property.
The Easier AI Editing Option
To successfully implement this approach, you will need some basic understanding of crawler web scraping and custom extraction functionality.
You can easily copy-paste the JS snippet code below to your favourite LLM or Mike King’s Kermit (the Screaming Frog SEO Spider JS snippet GPT) as reference and starting point. You must create your own JSON-LD script and spell out to the LLM what elements you want to extract from the webpage. However, the heavy lifting should be done for you, and using AI for this editing is highly efficient and time-effective.
For those who want a better understanding of the code and the purpose of each section, you can deep-dive into the information below.
The JS Snippet Code
As the Screaming Frog SEO Spider crawls each page, I will use JavaScript code to extract various elements from the page and add them to the JSON-LD structured data as variables.
Here is a reference of the full JS Snippet code:
// Extract the URL of the webpage
let url = window.location.href;
let urlId = `${url}#article`;


// Extract the first H1 tag
let h1 = document.querySelector('h1') ? document.querySelector('h1').textContent.trim() : '';


// Extract the meta description
let metaDescription = document.querySelector('meta[name="description"]') ? document.querySelector('meta[name="description"]').content.trim() : 'No Meta Description Found';


// Extract the published date from the datetime attribute in the <time> tag within .sej-auth-t
let datePublished = 'No Date Found';
let dateElement = document.querySelector('.sej-auth-t time');
if (dateElement) {
    datePublished = dateElement.getAttribute('datetime');
}


// Select the element containing the author information
let authorElement = document.querySelector('.dark-link.sej-auth-h');


// Initialize author details with empty strings
let authorName = '';
let authorUrl = '';
let authorId = '';
let sameAsLinks = '';


// Check if the author element exists, then extract the name and URL
if (authorElement) {
    authorName = authorElement.textContent.trim(); // Extract and clean up author name
    authorUrl = authorElement.href;                // Extract author URL
    authorId = `${authorUrl}/#person`;             // Construct @id by appending /#person


    // Extract all social media URLs within the .sej-asocial class for the sameAs array
    sameAsLinks = Array.from(document.querySelectorAll('.sej-asocial li a')).map(link => link.href);
}


// Extract the image URL for the author
let imageUrl = '';
let imageElement = document.querySelector('.avatar.img-circle');
if (imageElement) {
    imageUrl = imageElement.src;
}


// Count the total number of words on the page
let wordCount = document.body.innerText.split(/\s+/).length;


// Extract the reading time and convert to ISO 8601 duration
let timeRequired = '';
let readingTimeElement = document.querySelector('.sej-auth-t li:nth-child(3)');
if (readingTimeElement) {
    let readingTimeText = readingTimeElement.textContent.trim();
    let timeMatch = readingTimeText.match(/(\d+)\s*min/);
    if (timeMatch) {
        let minutes = parseInt(timeMatch[1]);
        timeRequired = `PT${minutes}M`; // Convert to ISO 8601 duration format
    }
}


// Extract hero image URL, width, and height directly from the hero image element
let heroImageUrl = '';
let heroImageWidth = '';
let heroImageHeight = '';


let heroImageElement = document.querySelector('.attachment-full.size-full.wp-post-image');
if (heroImageElement) {
    heroImageUrl = heroImageElement.src;


    // Try to get width and height from attributes first
    heroImageWidth = heroImageElement.getAttribute('width');
    heroImageHeight = heroImageElement.getAttribute('height');


    // If width or height are missing, parse the largest values from srcset
    if (!heroImageWidth || !heroImageHeight) {
        let srcset = heroImageElement.getAttribute('srcset');
        if (srcset) {
            let largestImage = srcset.split(',').map(entry => {
                let [url, size] = entry.trim().split(' ');
                return { url, size: parseInt(size) };
            }).sort((a, b) => b.size - a.size)[0];


            // Set hero image URL, width, and height based on largest image in srcset
            if (largestImage) {
                heroImageUrl = largestImage.url;
                heroImageWidth = largestImage.size;
                heroImageHeight = Math.round((heroImageWidth / 1600) * 840); // Adjust height based on aspect ratio if needed
            }
        }
    }
}


// Create the full JSON-LD object
let jsonLd = {
    "@context": "https://schema.org/",
    "@type": "Article",
    "url": url,
    "@id": urlId,
    "headline": h1,
    "description": metaDescription,
    "datePublished": datePublished,
    "wordCount": wordCount,
    "timeRequired": timeRequired,
    "image": {
        "@type": "ImageObject",
        "url": heroImageUrl,
        "height": heroImageHeight,
        "width": heroImageWidth
    },
    "speakable": {
        "@type": "SpeakableSpecification",
        "cssSelector": [
            "h1",
            ".sej-article entrycontent"
        ]
    },
    "author": {
        "@type": "Person",
        "name": authorName,
        "url": authorUrl,
        "@id": authorId,
        "sameAs":sameAsLinks
    },
    "publisher": {
        "@type": "Organization",
      "@id": "https://www.searchenginejournal.com/#organization",
      "url": "https://www.searchenginejournal.com",
      "sameAs": [
        "https://twitter.com/sejournal",
        "https://www.facebook.com/SearchEngineJournal",
        "https://www.linkedin.com/company/search-engine-journal",
        "https://www.youtube.com/c/searchenginejournal",
        "https://www.reddit.com/user/SearchEngineJournal",
        "https://www.google.com/search?kgmid=/m/011sh7hw",
        "http://www.pinterest.com/sejournal/"
      ],
      "name": "Search Engine Journal",
      "logo": [
        {
          "@type": "ImageObject",
          "@id": "https://www.searchenginejournal.com/#logo",
          "inLanguage": "en-US",
          "url": "https://www.searchenginejournal.com/wp-content/themes/sej/images/schema/compact.png",
          "width": 1000,
          "height": 1000,
          "caption": "Search Engine Journal"
        }
      ],
      "foundingDate": "2003",
      "slogan": "In a world ruled by algorithms, SEJ brings timely, relevant information for SEOs, marketers, and entrepreneurs to optimize and grow their businesses -- and careers.",
      "description": "Search Engine Journal is dedicated to producing the latest news, the best guides and how-tos for the SEO and marketer community.",
      "legalName": "Search Engine Journal",
      "alternateName": "SEJ"
    },
    "isPartOf": {
        "@type": "WebSite",
        "name": "Search Engine Journal",
        "@id": "https://www.searchenginejournal.com/#website",
        "url": "https://www.searchenginejournal.com/",
        "mainEntity": {
            "@id": urlId
        }
    }
};


// Beautify JSON-LD
let beautifiedJsonLd = JSON.stringify(jsonLd, null, 2);


// Manually wrap the JSON-LD with <script> tags
let scriptTagWrappedJsonLd = `<script type="application/ld+json">\n${beautifiedJsonLd}\n</script>`;


// Return the wrapped JSON-LD with <script> tags
return seoSpider.data(scriptTagWrappedJsonLd);
The JavaScript Code Explained
Now, let’s break down each bit of the code to explain how each extracted element gets dynamically added as a variable to the JSON-LD script.
Webpage URL and @id
To extract the webpage URL and @id, I’ve used the following JavaScript code:
// Extract the URL of the webpage
let url = window.location.href;
let urlId = `${url}#article`;
The URL is extracted using the window.location.href, which retrieves the full URL of the current webpage.
The same URL variable is used to populate the @id, which provides a unique identifier for the “article” schema type. However, this time, I’ve used a template literal (${url}#article) to append #article to the url. This approach effectively tags the url with a specific identifier, so that urlId will be https://example.com/page#article.
It then gets populated into my JSON-LD schema as follows:
"url": url,
"@id": urlId,
The Headline
To populate the “headline” of the article, I target the article’s title below:
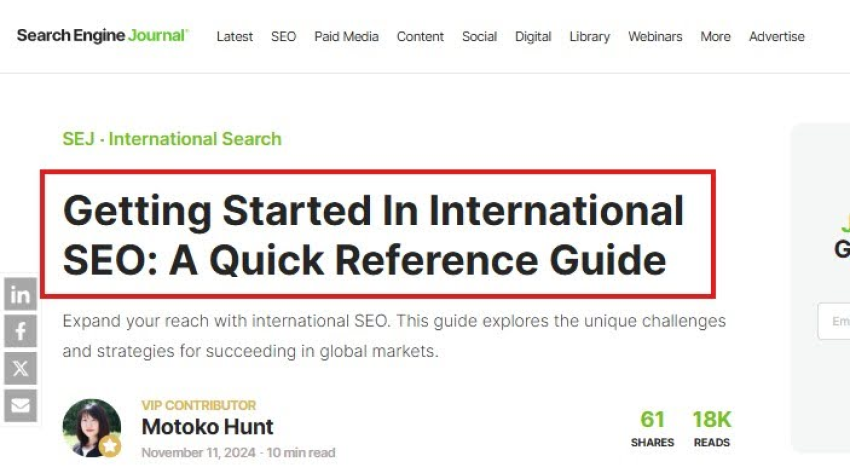
I use the following code to extract the H1 tag:
// Extract the first H1 tag
let h1 = document.querySelector('h1') ? document.querySelector('h1').textContent.trim() : '""';
The document.querySelector(‘h1’) looks for the page’s first <h1> element. If it finds one, it returns that element; if not, it returns an empty value inside quotation marks.
The .textContent extracts the text inside the<h1>, and .trim() removes any leading or trailing whitespace around that text.
In the schema markup script, the headline is populated using this variable:
"headline": h1,
The Meta Description
I used the following JavaScript code to extract the meta description:
// Extract the meta description
let metaDescription = document.querySelector('meta[name="description"]') ? document.querySelector('meta[name="description"]').content.trim() : '""';
The document.querySelector(‘meta[name=”description”]’) line is used to look for a tag with name=”description” in the HTML. If it finds this tag, it returns the element; if not, it returns an empty value inside quotation marks. The .trim() removes any leading or trailing whitespace.
In the schema markup script, the meta description value is populated using this variable:
"description": metaDescription,
The Date Published Value
For the date published value, I need to ensure that it follows the ISO 8601 datetime format to validate. The webpage is showing the publish date as “November 11, 2024”, but thankfully, the code is showing the datetime value in the correct ISO 8601 format:

To extract the datetime value for the datePublshed variable, I use the code below:
// Extract the published date from the datetime attribute in the <time> tag within .sej-auth-t
let datePublished = '""';
let dateElement = document.querySelector('.sej-auth-t time');
if (dateElement) {
    datePublished = dateElement.getAttribute('datetime');
}
This code extracts a datetime attribute value from a <time> tag within an element with the class .sej-auth-t.
If no datetime value is found, it returns an empty value inside quotation marks.
In the schema markup script, the datePublished value is populated using this variable:
"datePublished": datePublished,
The Word Count
To extract and calculate the number of words in the article, I use the following code:
// Select the article element
let articleElement = document.querySelector('article[data-clarity-region="article"]');
// Count the total number of words within the article element
let wordCount = articleElement ? articleElement.innerText.split(/\s+/).length : 0;
Here, I use the code to target the <article> tag with the attribute data-clarity-region="article", which uniquely identifies the article content.
The wordCount variable checks if articleElement exists. If it does, innerText extracts all visible text within the
After, the .split(/\s+/) divides this text by whitespace into an array of words and .length gives the count of words.
The .length gives the total count of items (words) in this array, and the String(…) wraps this number in String() to ensure the final result is a string (e.g., “123” instead of 123), which is necessary for JSON-LD validation.
If articleElement is not found, wordCount is set to empty quotation marks as a fallback.
The output gets populated into the JSON-LD script here:
"wordCount": wordCount,
Reading Time Required
To extract the required reading time, I have to perform some JavaScript wizardry. The format needs to be in ISO 8601, such as “PT14M,” which stands for 14 minutes.
The article is showing the reading time in the following format: “10 min read”. So we have some work to do.

The initial code looks like this:
// Extract the reading time and convert to ISO 8601 duration
let timeRequired = '';
let readingTimeElement = document.querySelector('.sej-auth-t li:nth-child(3)');
First, I initialise the timeRequired variable with an empty string (‘’). This variable will eventually store the reading time in ISO 8601 duration format if it’s found on the page.
The readingTimeElement attempts to select a specific element on the page. It uses document.querySelector(‘.sej-auth-t li:nth-child(3)’) to locate the third <li> element inside a container with the class .sej-auth-t.
The following code portion checks and extracts the text content:
if (readingTimeElement) {
    let readingTimeText = readingTimeElement.textContent.trim();
    let timeMatch = readingTimeText.match(/(\d+)\s*min/);
The if statement checks if readingTimeElement was found. If it’s null (not found), the code inside this block won’t execute.
If the element exists, readingTimeElement.textContent.trim() retrieves the visible text content from this element and removes any surrounding whitespace with .trim().
The timeMatch = readingTimeText.match(/(\d+)\s*min/); uses a regular expression to find the reading time in readingTimeText. If the pattern is found, timeMatch will be an array where the first captured group (timeMatch[1]) contains the numeric reading time in minutes.
And, finally:
if (timeMatch) {
        let minutes = parseInt(timeMatch[1]);
        timeRequired = `PT${minutes}M`; // Convert to ISO 8601 duration format
    }
}
I convert the time to ISO 8601 Duration Format.
If timeMatch exists (meaning the reading time was successfully matched), timeMatch[1] holds the minutes as a string (e.g., “10”).
The parseInt(timeMatch[1]) converts this string into an integer (10 in this case), which is stored in the minutes variable.
The code then constructs the ISO 8601 duration format using template literals: `PT${minutes}M`.
The final JSON-LD will contain the following variable with the timeRequired output:
"timeRequired": timeRequired,
The Hero Image
I nest an “ImageObject” to the “article” schema, which targets the following hero image on the page template:

I use JavaScript to extract the hero image URL, width, and height, and insert the extracted data into the markup as a nested “ImageObject ”. Here is the code:
// Extract hero image URL, width, and height directly from the hero image element
let heroImageUrl = '""';
let heroImageWidth = '""';
let heroImageHeight = '""';


let heroImageElement = document.querySelector('.attachment-full.size-full.wp-post-image');
if (heroImageElement) {
    heroImageUrl = heroImageElement.src;


    // Try to get width and height from attributes first
    heroImageWidth = heroImageElement.getAttribute('width');
    heroImageHeight = heroImageElement.getAttribute('height');


    // If width or height are missing, parse the largest values from srcset
    if (!heroImageWidth || !heroImageHeight) {
        let srcset = heroImageElement.getAttribute('srcset');
        if (srcset) {
            let largestImage = srcset.split(',').map(entry => {
                let [url, size] = entry.trim().split(' ');
                return { url, size: parseInt(size) };
            }).sort((a, b) => b.size - a.size)[0];


            // Set hero image URL, width, and height based on largest image in srcset
            if (largestImage) {
                heroImageUrl = largestImage.url;
                heroImageWidth = largestImage.size;
                heroImageHeight = Math.round((heroImageWidth / 1600) * 840); // Adjust height based on aspect ratio if needed
            }
        }
    }
}
Let’s take a look at the individual sections of the code block. To extract the hero image, I use the following code:
let heroImageElement = document.querySelector('.attachment-full.size-full.wp-post-image');
This searches the webpage for an <img> element with the classes attachment-full and size-full. If found, the element is stored in the heroImageElement variable.
Next, I extract the hero image URL using this line of code:
heroImageUrl = heroImageElement.src;
To extract the width and height of the hero image, the code attempts to retrieve the attributes directly from the image element:
// Try to get width and height from attributes first
    heroImageWidth = heroImageElement.getAttribute('width');
    heroImageHeight = heroImageElement.getAttribute('height');
If these attributes exist, their values are assigned to heroImageWidth and heroImageHeight.
However, If width or height attributes are missing, the code falls back to the srcset attribute, which contains a list of image URLs and their corresponding widths:
// If width or height are missing, parse the largest values from srcset
    if (!heroImageWidth || !heroImageHeight) {
        let srcset = heroImageElement.getAttribute('srcset');
        if (srcset) {
            let largestImage = srcset.split(',').map(entry => {
                let [url, size] = entry.trim().split(' ');
                return { url, size: parseInt(size) };
            }).sort((a, b) => b.size - a.size)[0];
If the height attribute is missing, the code calculates it using an assumed aspect ratio:
// Set hero image URL, width, and height based on largest image in srcset
            if (largestImage) {
                heroImageUrl = largestImage.url;
                heroImageWidth = largestImage.size;
                heroImageHeight = Math.round((heroImageWidth / 1600) * 840); // Adjust height based on aspect ratio if needed
            }
Finally, the extracted values are then used to populate the “ImageObject” schema in the JSON-LD script:
"image": {
        "@type": "ImageObject",
        "url": heroImageUrl,
        "height": heroImageHeight,
        "width": heroImageWidth
    }
The Speakable JSON-LD
This is optional. However, I decided to add “speakable” JSON-LD for voice search optimization, and I included the following snippet in the schema markup:
"speakable": {
        "@type": "SpeakableSpecification",
        "cssSelector": [
            "h1",
            ".sej-article entrycontent"
        ]
    },
The code is static as it remains the same across all blog article webpages. The “speakable” schema allows you to specify parts of a webpage that are particularly suitable for text-to-speech conversion by voice assistants like Google Home devices or Alexa. This feature helps provide audio summaries of your content.
You can use XPATH or CSS Selector to define the “SpeakableSpecification” schema type. For my example, I opted to identify the “speakable” content with CSS Selectors.
The cssSelector property contains a list of CSS selectors pointing to the elements on the webpage that should be included in the audio summary.
The headline (h1) provides an introductory context or title when the content is read aloud, while the .sej-article entrycontent targets the primary body text.
The Author Information
I use the “person” schema for the author information and link it back to the article’s schema with the “author” property. Looking at the author information below, I can see that there are many elements that I can extract and use to populate the “person” schema properties:

I’ll extract the author’s name, bio page URL, @id, sameAs social links, job title, place of work and the place of work URL (if available). Inside the schema markup, it looks as follows:
"author": {
        "@type": "Person",
        "name": authorName,
        "url": authorUrl,
        "@id": authorId,
        "jobTitle": jobTitle,
        "worksFor": {
            "@type": "Organization",
            "name": worksForName,
            "url": worksForUrl
        },
        "sameAs":sameAsLinks
    },
Author Name, Profile URL and ID
The authorElement variant attempts to locate an HTML element with the classes .dark-link and .sej-auth-h, which is expected to contain the author’s information.
After that, the various variables are initialised as empty strings. If the elements are found, these will store the extracted details.
If authorElement is found, the text content of the authorName is extracted and trimmed of whitespace. The authorUrl extracts the href attribute of this element, which is the link to the author’s profile page. The authorId is a constructed identifier that appends /#person to the authorUrl, which creates a unique ID for structured data.
The code is as follows:
// Select the element containing the author information
let authorElement = document.querySelector('.dark-link.sej-auth-h');


// Initialize author details with empty strings
let authorName = "";
let authorUrl = "";
let authorId = "";
let sameAsLinks = "";
let jobTitle = "";       // Initialize job title as an empty string
let worksForName = "";   // Initialize worksFor name as an empty string
let worksForUrl = "";    // Initialize worksFor URL as an empty string


// Check if the author element exists, then extract the name and URL
if (authorElement) {
    authorName = authorElement.textContent.trim(); // Extract and clean up author name
    authorUrl = authorElement.href;                // Extract author URL
    authorId = `${authorUrl}/#person`;             // Construct @id by appending /#person
SameAs Links
Next, I’ll extract the links in the author’s tooltip and add them to the “sameAs” property as an array. The purpose of the links is to reference the author’s digital footprint across the web to improve EEAT and establish that they are a real entity.
The “sameAs” link extraction code is as follows:
// Extract all social media URLs within the .sej-asocial class for the sameAs array
    sameAsLinks = Array.from(document.querySelectorAll('.sej-asocial li a')).map(link => link.href);
The code queries for any <a> tags inside list items (<li>) within the .sej-asocial class. These links represent the author’s social media profiles. Using Array.from, it converts the NodeList of <a> elements into an array of URLs by mapping each link’s href attribute.
Job Title and Organization
To extract the job title, organization name, and URL, I’ll select an element with the class .sej-auth-dpos, which is expected to contain the author’s job title and organization.
For the job title specifically, I’ll use the following code:
// Extract the job title and organization name from
let jobTitleElement = document.querySelector('.sej-auth-dpos');
if (jobTitleElement) {
    let jobText = jobTitleElement.textContent.trim();
    let jobMatch = jobText.match(/^(.*)\s+at\b/);  // Match text before "at"
    if (jobMatch) {
        jobTitle = jobMatch[1].trim();  // Capture the job title part only
    }
If jobTitleElement exists, the code captures its text content.
A regular expression ^(.*)\s+at\b extracts everything before the word “at” as jobTitle. This assumes the job title precedes the organization name in the text.
For the organization name and URL, I use the following code:
// Check if there's an <a> tag for the organization name
    let companyElement = jobTitleElement.querySelector('a');
    if (companyElement) {
        // Extract company name and URL if the <a> tag is present
        worksForName = companyElement.textContent.trim();
        worksForUrl = companyElement.href;
    } else {
        // If no <a> tag, extract organization name directly from the span's text after "at"
        let worksForMatch = jobText.match(/\bat\s+(.+)/);  // Match text after "at"
        if (worksForMatch) {
            worksForName = worksForMatch[1].trim();
        }
    }
The companyElement variable checks for an <a> tag inside jobTitleElement, assuming it might link to the organization’s website.
If present, worksForName and worksForUrl are set to the organization’s name and URL.
If the <a> tag isn’t found, a fallback regular expression extracts the organization name directly from the text after “at.”
The Publisher information
I use the article’s “publisher” property to reference the “organization” schema type. Thankfully, the “publisher” section of the JSON-LD code is static, as it does not require editing from page to page.
The information is collected from SEJ’s real “organization” schema details and is showing as follows:
"publisher": {
        "@type": "Organization",
      "@id": "https://www.searchenginejournal.com/#organization",
      "url": "https://www.searchenginejournal.com",
      "sameAs": [
        "https://twitter.com/sejournal",
        "https://www.facebook.com/SearchEngineJournal",
        "https://www.linkedin.com/company/search-engine-journal",
        "https://www.youtube.com/c/searchenginejournal",
        "https://www.reddit.com/user/SearchEngineJournal",
        "https://www.google.com/search?kgmid=/m/011sh7hw",
        "http://www.pinterest.com/sejournal/"
      ],
      "name": "Search Engine Journal",
      "logo": [
        {
          "@type": "ImageObject",
          "@id": "https://www.searchenginejournal.com/#logo",
          "inLanguage": "en-US",
          "url": "https://www.searchenginejournal.com/wp-content/themes/sej/images/schema/compact.png",
          "width": 1000,
          "height": 1000,
          "caption": "Search Engine Journal"
        }
      ],
      "foundingDate": "2003",
      "slogan": "In a world ruled by algorithms, SEJ brings timely, relevant information for SEOs, marketers, and entrepreneurs to optimize and grow their businesses -- and careers.",
      "description": "Search Engine Journal is dedicated to producing the latest news, the best guides and how-tos for the SEO and marketer community.",
      "legalName": "Search Engine Journal",
      "alternateName": "SEJ"
    },
Website JSON-LD
I used the article’s “isPartOf” property to connect the “article” schema to the “website” schema for better semantic contextualisation. The information in the code is mostly static:
"isPartOf": {
        "@type": "WebSite",
        "name": "Search Engine Journal",
        "@id": "https://www.searchenginejournal.com/#website",
        "url": "https://www.searchenginejournal.com/",
        "mainEntity": {
            "@id": urlId
        }
    }
I decided to add the “mainEntity” property to the “website” schema to explicitly declare the primary content (the article) as the webpage’s main focus.
To populate the “mainEntity” property, I used the same urlId that I created earlier for the webpage URL.
Beautify and Wrap in Script Tags
The last bit of code ensures that the JSON-LD script is beautified – meaning that it is easier for us humans to read:
// Beautify JSON-LD
let beautifiedJsonLd = JSON.stringify(jsonLd, null, 2);
(That said, if you want to add the minified version of the script, which is better for production – please delete this line of code).
Now, we can wrap the beautified and fully populated JSON-LD code in script tags so it is ready to copy-paste into our website’s CMS pages:
// Manually wrap the JSON-LD with <script> tags
let scriptTagWrappedJsonLd = `<script type="application/ld+json">\n${beautifiedJsonLd}\n</script>`;
Add Your JavaScript Snippet to Screaming Frog
Now that I’ve built my script, I can add it to the Screaming Frog SEO Spider.
Open the SEO Spider and turn on JavaScript rendering. From the menu, go to Configuration > Crawl Config > Rendering > JavaScript.
After, navigate to the Custom JavaScript section, which can be found here: Configuration > Custom > Custom JavaScript.
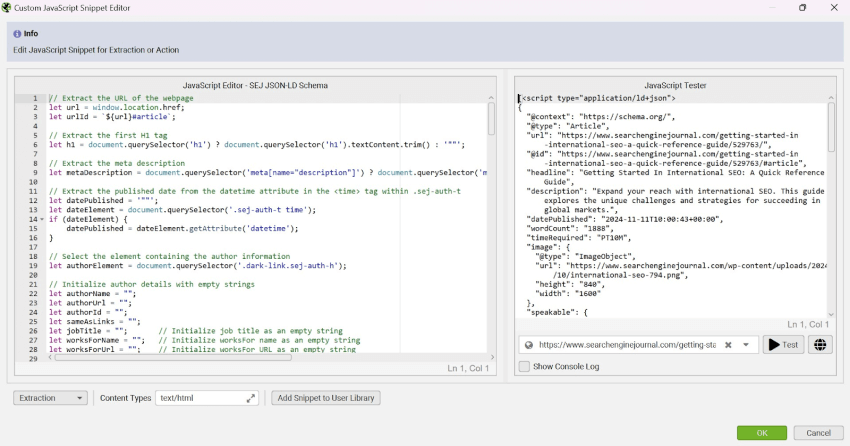
Click the ‘+ Add’ button to insert a new custom JavaScript snippet. Assign your preferred name to the snippet. Finally, click the ‘JS’ button to open the JavaScript Snippet Editor.

Inside the JavaScript snippet editor, copy-paste the JavaScript code you’ve been working on into the JavaScript Editor input box:

You can use the JavaScript Tester functionality to ensure the script is working correctly.
Copy-paste a test URL into the URL input field and click the ‘Test’ button. Once the test crawl is complete, you should see your JavaScript snippet output in the tester box:

I used the JavaScript Tester extensively while building the script. The tester functionality is great for debugging issues by flagging console errors that point you in the right direction. If you encounter any errors, you can feed them into your LLM to regenerate the correct code or ask for advise.
Once you’ve wrapped up your script and are satisfied with the final output, you can take an optional step and save the script into your custom JavaScript snippet library. Click on the ‘Add Snippet to User Library’ button to do so:

You can access your private snippets by clicking the ‘+ Add from Library’ found in the main ‘Custom JavaScript’ configuration dashboard:

Final JSON-LD Script Test
To ensure that your JSON-LD script is working correctly across URLs from your selected page template, I would advise to switch your crawl to ‘List Mode’: Mode > List

Now, you can select the ‘Upload’ button and choose the ‘Enter Manually…’ option.
Add a sample of 10 URLs as a test in the popup input box to ensure that the JSON-LD output is correct across all pages.

Click ‘Next’ and start your crawl.
Validate with Google and Schema.org
When working with schema markup, it is always advisable to validate your schema code before adding it to your website. I always recommend validating the code using the Rich Results Test for Google-supported rich results and schema types.
Additionally, I would advise running the code through Schema.org’s validator—especially if your script contains non-Google-supported schema types.
Run the Crawl and Extract the Schema Markup
Here is when it all comes together. Run a ‘List Mode’ crawl again with your full list of URLs or a standard spider crawl of your website.
When the crawl is complete, navigate to the ‘Custom JavaScript’ tab, where you will find the JSON-LD schema markup scripts ready for you to copy-paste into the CMS or export as a spreadsheet.

With the power of the Screaming Frog SEO Spider, we can now generate schema markup scripts at scale. Use this power responsibly, and feel free to add your feedback.

Leave a Reply